I Built a Fully Offline AI Agent on Android. It Listens, Thinks, Acts, and Speaks Back.
 DEVELOPERS
No server. No API key. No internet. Just a phone doing things on its own.

Last month, I wrote about the pain of running an LLM on a $150 Android phone. That article ended with a working chat app — a model that could talk. Cool, but ultimately a party trick.
This time, I wanted something that actually does things.
Not "generate text about the weather." Actually check the weather. Not "write a function that calculates tips." Actually calculate a tip and speak the answer. An AI that listens to your voice, understands what you want, calls the right function, and speaks the result — all without touching a server.
Sounds like science fiction? It's about 400 lines of Kotlin and three small models.
Here's how I built it.
The Architecture (Spoiler: It's a Pipeline, Not a Model)
The biggest misconception about AI agents is that you need one huge model that does everything. You don't. You need a pipeline — small, specialized models chained together, each doing one thing well.
Here's what the full loop looks like:

Six stages. Four models. One Flow collector.
Let me walk through each stage, because the devil lives in the transitions between them.
Stage 1: Voice Activity Detection — The Bouncer
VAD is the unsung hero of any voice pipeline. Without it, you're transcribing silence, burning CPU, and draining battery for nothing.
The job is simple: is the user talking right now, or not?
1import com.runanywhere.sdk.public.extensions.VoiceAgent.VoiceSessionConfig23val voiceConfig = VoiceSessionConfig(4 silenceDuration = 1.5, // Wait 1.5s of silence before processing5 speechThreshold = 0.1f, // Audio energy threshold (0.0 - 1.0)6 continuousMode = true, // Auto-resume listening after response7 autoPlayTTS = false // We'll handle audio playback ourselves8)
That speechThreshold of 0.1f is deceptively important. Set it too low, and the air conditioner triggers transcription. Too high, and soft-spoken users get ignored. I spent an entire afternoon in a coffee shop calibrating this value with ambient noise.
The real insight: VAD isn't just about detection — it's about when to stop listening. That silenceDuration of 1.5 seconds means: "if the user pauses for 1.5 seconds, assume they're done talking." Too short (0.5s) and you cut people off mid-thought. Too long (3s) and the app feels sluggish.
1Sweet spots I found through testing:2 Quiet room: threshold = 0.05, silence = 1.0s3 Office environment: threshold = 0.1, silence = 1.5s4 Noisy/outdoor: threshold = 0.2, silence = 2.0s5 Car (engine noise): threshold = 0.3, silence = 1.5s
The pipeline doesn't process anything until VAD says "speech detected." On a budget phone, this means the CPU is nearly idle 90% of the time. That's the difference between -2% battery per 10 minutes and -8%.
Stage 2: Speech-to-Text — Whisper, But Make It Fast
Once VAD captures a speech segment, it goes to STT. I'm using Whisper Tiny through ONNX Runtime — a 40MB model that converts speech to text entirely on-device.
The audio capture itself is straightforward, but has a gotcha. Here's the real code from the starter example:
1private class AudioCaptureService {2 private var audioRecord: AudioRecord? = null3 @Volatile private var isCapturing = false45 companion object {6 const val SAMPLE_RATE = 16000 // Whisper expects 16kHz7 const val CHUNK_SIZE_MS = 100 // 100ms chunks8 }910 fun startCapture(): Flow<ByteArray> = callbackFlow {11 val bufferSize = AudioRecord.getMinBufferSize(12 SAMPLE_RATE, AudioFormat.CHANNEL_IN_MONO, AudioFormat.ENCODING_PCM_16BIT13 )14 val chunkSize = (SAMPLE_RATE * 2 * CHUNK_SIZE_MS) / 10001516 audioRecord = AudioRecord(17 MediaRecorder.AudioSource.MIC,18 SAMPLE_RATE,19 AudioFormat.CHANNEL_IN_MONO,20 AudioFormat.ENCODING_PCM_16BIT,21 maxOf(bufferSize, chunkSize * 2)22 )2324 audioRecord?.startRecording()25 isCapturing = true2627 val readJob = launch(Dispatchers.IO) {28 val buffer = ByteArray(chunkSize)29 while (isActive && isCapturing) {30 val bytesRead = audioRecord?.read(buffer, 0, chunkSize) ?: -131 if (bytesRead > 0) {32 trySend(buffer.copyOf(bytesRead))33 }34 }35 }3637 awaitClose {38 readJob.cancel()39 isCapturing = false40 audioRecord?.stop()41 audioRecord?.release()42 audioRecord = null43 }44 }45}
The gotcha: SAMPLE_RATE = 16000. Whisper expects 16kHz mono PCM. Most Android examples default to 44100Hz stereo. If you feed 44.1kHz audio to a 16kHz model, you don't get an error — you get gibberish transcriptions. I debugged this for four hours before checking the sample rate. Don't be me.

STT Latency By Device
| Device | Whisper Tiny (5s audio) | Whisper Small (5s audio) |
|---|---|---|
| Budget (SD 4 Gen 1) | ~1.2s | ~4.5s |
| Mid-range (Tensor G2) | ~0.6s | ~2.1s |
| Flagship (SD 8 Gen 3) | ~0.3s | ~0.9s |
Whisper Tiny at ~1.2s on a budget phone. That's usable. Whisper Small at 4.5s? That's a different conversation — literally, the user has moved on by then.
My rule: If your STT takes longer than the audio it's transcribing, you've chosen the wrong model.
Stage 3: The Brain — LLM With Tool Calling
This is where it gets interesting. The LLM doesn't just generate text — it decides what to do.
Traditional LLMs: "The weather in Tokyo is typically warm in summer." Useless.
LLM with tool calling: <tool_call>{"tool":"get_weather","arguments":{"city":"Tokyo"}}</tool_call>. Now we're cooking.
Defining Tools
Tools are defined with a schema the model understands. This is straight from the starter app's ToolCallingScreen.kt:
1import com.runanywhere.sdk.public.extensions.LLM.RunAnywhereToolCalling2import com.runanywhere.sdk.public.extensions.LLM.ToolDefinition3import com.runanywhere.sdk.public.extensions.LLM.ToolParameter4import com.runanywhere.sdk.public.extensions.LLM.ToolParameterType5import com.runanywhere.sdk.public.extensions.LLM.ToolValue67RunAnywhereToolCalling.registerTool(8 definition = ToolDefinition(9 name = "get_weather",10 description = "Gets the current weather for a given location using Open-Meteo API",11 parameters = listOf(12 ToolParameter(13 name = "location",14 type = ToolParameterType.STRING,15 description = "City name (e.g., 'San Francisco', 'London', 'Tokyo')",16 required = true17 )18 ),19 category = "Utility"20 ),21 executor = { args ->22 val location = args["location"]?.stringValue ?: "San Francisco"23 fetchWeather(location) // returns Map<String, ToolValue>24 }25)
Each tool is a contract: name, description, parameters with types, and a category. The LLM reads these schemas as part of its system prompt and decides which tool (if any) to call based on the user's request.
Notice: the executor is a suspend lambda returning Map<String, ToolValue>. It can do anything — read a database, check a sensor, call a cached API, compute a result. The LLM never knows or cares about the implementation. It just gets structured results back.

The Orchestration Loop
Here's the magic — the SDK handles the full loop automatically:
1import com.runanywhere.sdk.public.extensions.LLM.ToolCallingOptions23val result = RunAnywhereToolCalling.generateWithTools(4 prompt = transcribedText, // "What's the weather in Tokyo?"5 options = ToolCallingOptions(6 maxToolCalls = 3, // Max tool calls per turn7 autoExecute = true, // Execute tools automatically8 temperature = 0.7f,9 maxTokens = 51210 )11)1213// result.text = "The weather in Tokyo is 22°C and partly cloudy."14// result.toolCalls = [ToolCall(toolName="get_weather", arguments={location: "Tokyo"})]15// result.toolResults = [ToolResult(success=true, result={temp: 22, ...})]
What happens under the hood:
- LLM receives the prompt + tool schemas in system prompt
- LLM generates a response containing
<tool_call>tags - SDK parses the tool call (done in C++ for speed and consistency)
- Executor runs, produces a result
- SDK builds a follow-up prompt: "Tool returned: {result}. Now respond to the user."
- LLM generates the final natural language response
- Loop repeats if the model calls another tool (up to
maxToolCalls)
Building Real Tools
The starter app registers three tools — weather, time, and calculator. Here's the real code for all three:
1// 1. Weather — hits Open-Meteo API (free, no key needed)2RunAnywhereToolCalling.registerTool(3 definition = ToolDefinition(4 name = "get_weather",5 description = "Gets the current weather for a given location using Open-Meteo API",6 parameters = listOf(7 ToolParameter("location", ToolParameterType.STRING,8 "City name (e.g., 'San Francisco', 'London')", required = true)9 ),10 category = "Utility"11 ),12 executor = { args ->13 val location = args["location"]?.stringValue ?: "San Francisco"14 fetchWeather(location) // geocode -> weather API -> parsed result15 }16)1718// 2. Current time — no API needed, just device clock19RunAnywhereToolCalling.registerTool(20 definition = ToolDefinition(21 name = "get_current_time",22 description = "Gets the current date, time, and timezone information",23 parameters = emptyList(),24 category = "Utility"25 ),26 executor = {27 val now = Date()28 val dateFormatter = SimpleDateFormat("EEEE, MMMM d, yyyy 'at' h:mm:ss a", Locale.getDefault())29 val timeFormatter = SimpleDateFormat("HH:mm:ss", Locale.getDefault())30 val tz = TimeZone.getDefault()31 mapOf(32 "datetime" to ToolValue.string(dateFormatter.format(now)),33 "time" to ToolValue.string(timeFormatter.format(now)),34 "timezone" to ToolValue.string(tz.id),35 "utc_offset" to ToolValue.string(tz.getDisplayName(false, TimeZone.SHORT))36 )37 }38)3940// 3. Calculator — simple expression evaluator41RunAnywhereToolCalling.registerTool(42 definition = ToolDefinition(43 name = "calculate",44 description = "Performs math calculations. Supports +, -, *, /, and parentheses",45 parameters = listOf(46 ToolParameter("expression", ToolParameterType.STRING,47 "Math expression (e.g., '2 + 2 * 3', '(10 + 5) / 3')", required = true)48 ),49 category = "Utility"50 ),51 executor = { args ->52 val expression = args["expression"]?.stringValue ?: "0"53 evaluateMathExpression(expression) // custom parser, returns Map<String, ToolValue>54 }55)
The weather tool is the interesting one — it actually hits the Open-Meteo API (free, no API key), geocodes the city name, and returns structured weather data. All on-device processing, but the tool itself can reach the network if available.

Stage 4: Text-to-Speech — Closing the Loop
The LLM has generated a text response. Now it needs a voice.
Piper TTS through ONNX Runtime — a ~15MB voice model that synthesizes speech locally. The quality won't fool anyone into thinking it's human, but it's clear, fast, and works offline.
1TTS Latency for "The weather in Tokyo is 22 degrees and partly cloudy":2 Budget phone: ~300ms3 Mid-range: ~150ms4 Flagship: ~80ms
Fast enough that it's never the bottleneck.
The Secret Sauce: Streaming Overlap
If you run these stages sequentially, the latency is brutal:
1Sequential pipeline (worst case):2 VAD detection: ~30ms3 STT (Whisper): ~1200ms4 LLM (0.5B): ~3000ms (50 tokens x 60ms/tok)5 TTS (Piper): ~300ms6 ─────────────────────────7 Total: ~4.5 seconds
Four and a half seconds from "user stops talking" to "phone starts speaking." Painful.
But here's the trick: you don't have to wait for the LLM to finish before starting TTS.

With streaming, the LLM emits tokens one at a time. As soon as the first complete sentence is ready, TTS starts synthesizing it. While TTS is speaking the first sentence, the LLM is still generating the second.
1Streaming pipeline (with overlap):2 VAD detection: ~30ms3 STT (Whisper): ~1200ms4 LLM first token: ~200ms5 LLM first sentence: ~800ms6 TTS starts: immediately after first sentence7 ─────────────────────────8 User hears voice: ~2.2 seconds
From 4.5 seconds to 2.2. That's the difference between "this is broken" and "this is fast."
The entire pipeline in the real starter app is one collect block:
1import com.runanywhere.sdk.public.extensions.VoiceAgent.VoiceSessionEvent2import com.runanywhere.sdk.public.extensions.streamVoiceSession34val audioFlow = audioCaptureService.startCapture()56val config = VoiceSessionConfig(7 silenceDuration = 1.5,8 speechThreshold = 0.1f,9 autoPlayTTS = false,10 continuousMode = true11)1213scope.launch {14 RunAnywhere.streamVoiceSession(audioFlow, config).collect { event ->15 when (event) {16 is VoiceSessionEvent.Started ->17 sessionState = VoiceSessionState.LISTENING1819 is VoiceSessionEvent.Listening ->20 audioLevel = event.audioLevel2122 is VoiceSessionEvent.SpeechStarted ->23 sessionState = VoiceSessionState.SPEECH_DETECTED2425 is VoiceSessionEvent.Processing ->26 sessionState = VoiceSessionState.PROCESSING2728 is VoiceSessionEvent.Transcribed ->29 showTranscript(event.text)3031 is VoiceSessionEvent.Responded ->32 showAgentResponse(event.text)3334 is VoiceSessionEvent.Speaking ->35 sessionState = VoiceSessionState.SPEAKING3637 is VoiceSessionEvent.TurnCompleted -> {38 event.audio?.let { playWavAudio(it) }39 sessionState = VoiceSessionState.LISTENING // Loop back40 }4142 is VoiceSessionEvent.Error ->43 showError(event.message)4445 is VoiceSessionEvent.Stopped ->46 sessionState = VoiceSessionState.IDLE47 }48 }49}
One Flow collector. One coroutine scope. The entire voice agent pipeline — listen, transcribe, think, act, speak, repeat — in a single collect block. That TurnCompleted event gives you the WAV audio bytes to play, and then loops right back to listening.
What Goes Wrong (And How to Fix It)
I've been painting a rosy picture. Let me tell you what actually breaks.
Problem 1: The Model Calls the Wrong Tool
A 0.5B model isn't GPT-4. Ask it "what's 15% of the bill" and sometimes it calls get_weather instead of calculate. The fix:
1// Be explicit in tool descriptions2ToolDefinition(3 name = "calculate",4 description = """5 Performs math calculations. Supports +, -, *, /, and parentheses.6 Use this when the user asks to calculate, compute, add, subtract,7 multiply, divide, or find a percentage. Examples: '15% of 80',8 '120 / 4', '2^10'.9 """.trimIndent(),10 // ...11)
Verbose descriptions help small models. GPT-4 infers intent from one sentence. A 0.5B model needs examples.
Problem 2: Tool Calls Loop Forever
Sometimes the model calls a tool, gets the result, and then calls the same tool again. That's why maxToolCalls exists:
1ToolCallingOptions(2 maxToolCalls = 3, // Safety valve — stops after 3 calls3 autoExecute = true,4 temperature = 0.7f,5 maxTokens = 5126)
Problem 3: VAD False Positives in Noisy Environments
A dog barking. A door closing. Music in the background. All trigger false positives.
1// Default — fine for quiet rooms2VoiceSessionConfig(speechThreshold = 0.1f)34// For noisy environments, increase threshold5VoiceSessionConfig(speechThreshold = 0.2f)
Better yet — let users calibrate it. Record 5 seconds of ambient noise, measure the peak energy, set the threshold to 2x that.
Problem 4: The Model Responds With Markdown
"Here's the weather: Tokyo - 22 C, partly cloudy"
That's great on screen. TTS reads it as "Here's the weather. Asterisk asterisk Tokyo asterisk asterisk." Horrifying.
The fix is in the system prompt:
1Keep responses SHORT — one or two sentences max. You are being spoken2aloud. NEVER use markdown, bullet points, numbered lists, asterisks,3or special formatting. Write plain conversational sentences only.
The Complete Model Stack
Here's every model the agent uses:

| Component | Model | Format | Size | RAM |
|---|---|---|---|---|
| LLM | Qwen 2.5 0.5B Instruct | GGUF (Q6_K) | ~500MB | ~600MB |
| STT | Sherpa-ONNX Whisper Tiny | ONNX | 40MB | ~80MB |
| TTS | Piper (en_US lessac medium) | ONNX | 15MB | ~50MB |
| VAD | Energy-based (built-in) | — | 0MB | ~0MB |
| Total | ~555MB | ~730MB |
That's it. A fully functional voice agent in ~555MB on disk and ~730MB in RAM. It runs comfortably on any phone with 3GB+ RAM.
For comparison, the ChatGPT app uses ~200MB on disk but requires constant internet, costs per query, and sends every word you say to a server.
Adding More Intelligence: LoRA for Domain Expertise
Want the agent to understand medical terminology? Legal jargon? Your company's product names?
LoRA adapters — small files (~20MB) that modify the base model's behavior without replacing it:
1import com.runanywhere.sdk.public.extensions.LLM.LoRAAdapterConfig2import com.runanywhere.sdk.public.extensions.loadLoraAdapter3import com.runanywhere.sdk.public.extensions.clearLoraAdapters45// Load the base model6RunAnywhere.loadLLMModel("qwen2.5-0.5b-instruct-q6_k")78// Add a medical terminology adapter9RunAnywhere.loadLoraAdapter(10 LoRAAdapterConfig(11 path = "/path/to/medical-qa-Q8_0.gguf",12 scale = 0.8f // 80% adapter influence13 )14)1516// Now the model understands medical terms better17// Switch to legal for a different use case18RunAnywhere.clearLoraAdapters()19RunAnywhere.loadLoraAdapter(20 LoRAAdapterConfig(21 path = "/path/to/legal-lora.gguf",22 scale = 1.0f23 )24)
The starter app ships with four adapters: Code Assistant, Reasoning Logic, Medical QA, and Creative Writing. Each downloads from Hugging Face as a single GGUF file. One ~500MB base model. Multiple ~20MB adapters. Swap in milliseconds.
The Big Picture: What You're Actually Building
Step back. Look at what we've assembled:
- Voice in: Microphone -> VAD -> STT (Whisper Tiny, 40MB)
- Brain: LLM (Qwen 2.5 0.5B, ~500MB) with tool calling
- Actions: Arbitrary Kotlin functions as tools
- Personality: LoRA adapters for domain expertise
- Voice out: TTS (Piper, 15MB) with streaming overlap
This isn't a chatbot. This is an agent framework that runs on a phone without internet.

Two years ago, this required a server rack. One year ago, it required a flagship phone. Today, it runs on a $150 device with 4GB of RAM.
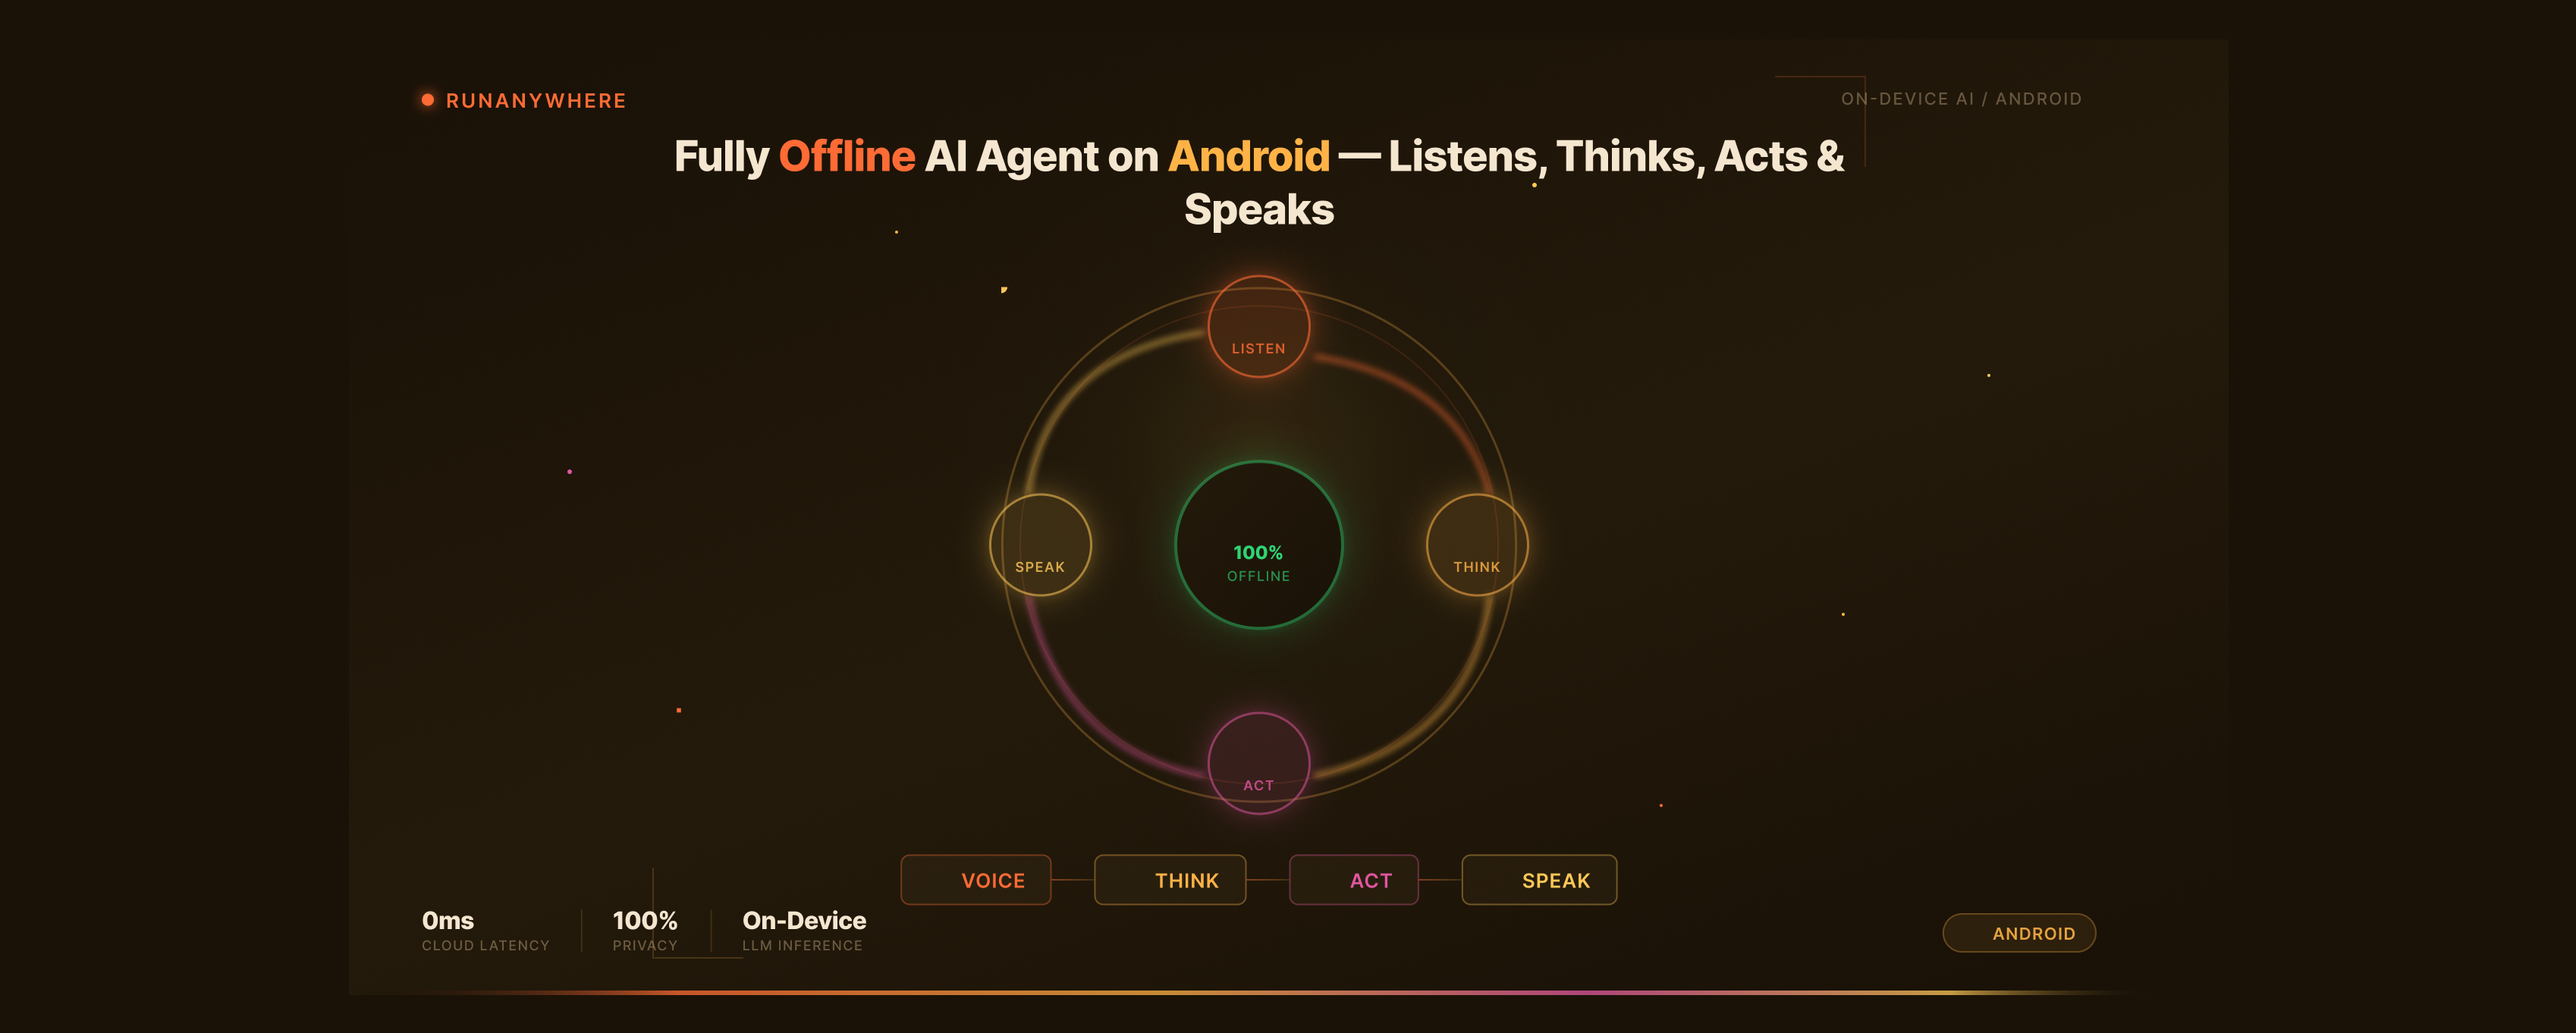
The Numbers: End-to-End Benchmarks
I tested the complete agent pipeline on three devices:
.png&w=1920&q=75)
| Metric | Budget | Mid-Range | Flagship |
|---|---|---|---|
| Device | Redmi Note 12 | Pixel 7a | Galaxy S24 |
| VAD -> Speech Detected | ~30ms | ~30ms | ~30ms |
| STT (5s utterance) | ~1.2s | ~0.6s | ~0.3s |
| LLM + Tool Call | ~2.5s | ~1.2s | ~0.6s |
| TTS (1 sentence) | ~300ms | ~150ms | ~80ms |
| End-to-end (sequential) | ~4.0s | ~2.0s | ~1.0s |
| End-to-end (streaming) | ~2.5s | ~1.3s | ~0.7s |
| RAM (all models loaded) | ~1.1GB | ~1.1GB | ~1.1GB |
| Battery (10min active) | -5% | -3% | -1.5% |
The streaming column is the one that matters. 2.5 seconds on a budget phone. That's slower than cloud APIs on good internet — but it works on no internet. In a rural clinic. In a mine shaft. On an airplane. Anywhere.
Getting Started
If you want to build this yourself:
- Clone the Kotlin starter example
- Open in Android Studio, build, run
- The Pipeline screen is the complete voice agent
- The Tools screen shows tool registration and execution
- Models download on first launch (~500MB total)
The app uses the RunAnywhere SDK:
1// build.gradle.kts2dependencies {3 implementation("io.github.sanchitmonga22:runanywhere-sdk-android:0.20.7")4 implementation("io.github.sanchitmonga22:runanywhere-llamacpp-android:0.20.7")5 implementation("io.github.sanchitmonga22:runanywhere-onnx-android:0.20.7")6}
Every feature in this article — voice sessions, tool calling, LoRA — is a real API that ships in the SDK. Not a prototype. Not a proof of concept. The code snippets in this article are from the actual starter app source.
What's Next
The models are getting better fast. Gemma 3n adds multimodal understanding — the same agent could soon see through the camera, hear through the mic, and act through tools, all locally.
But you don't need to wait for next-gen models. Qwen 2.5 0.5B with tool calling works today. On budget phones. Without internet.
The future of AI agents isn't in the cloud. It's in your pocket.
If this was useful, follow for Part 3 where I'll dive into on-device RAG — building a private knowledge base that lives entirely on your phone, with vector search in under 50ms.
Tags: android-development, on-device-ai, kotlin, voice-assistant, ai-agents